Space Tunnel Tutorial (GIMP)
3 posters
Page 1 of 1

Space Tunnel Tutorial (GIMP)
![]() by Phoenix Sun Dec 16, 2007 6:42 am
by Phoenix Sun Dec 16, 2007 6:42 am
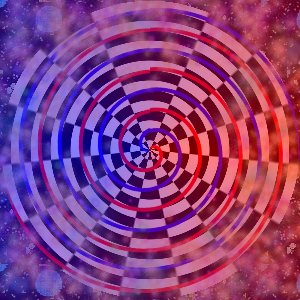
Here is how to make a Space Tunnel like this on GIMP (it may also work on Photoshop):

First of all, download these brushes.
Next, create a transparent image, mine was 300x300 however yours can be different.
Now click on Filters-->Render-->Pattern-->Checkerboard.
Also I used black and white. You may use different.
I used a size of 20 Pixels, however you may wish to use smaller, depending on your image size.
You should end up with something like this:

Now Select a color, I used red. Draw a line from the top left to the right hand side, about 4 lines from the top on the right. Now draw some more sloping lines all the way from the right to the left. Make sure that they "join up" vertically - where one line finishes on the right should be exactly where the next line starts on the left.
You should end up with something like this:

Now you may (this is optional) select another color, and draw lines in between the other color. I used blue.
You should end up with something like this:

Now click on Filters-->Distort-->Polar Coordinates.
You should end up with something like this (note: You may only have 1 color if you skipped the previous instruction):

Now go to fill and select a pattern or a color. Dark colors/patterns work best. I used a holo sheet (1/2) ( ) Then fill the background.
You should end up with something like this:

No, remember them nice sparkly brushes you downloaded? Select 1-3 of them, and brush around. However, don't get too close to the center of the spiral.
You should end up with something like this:

That's it, however there is something else you can do (it's optional). Create a new transparent layer. Go to Blend and select FG-BG (foreground to background). Now select 2 colors, 1 as your background, 1 as your foreground. I used red and blue, the same as the lines in the spiral. Set the shape to conical. Click in the middle of the new layer and hold Ctrl. Drag it to the right boundary and let go. Now lower the transparency of the layer until you think it looks good. About 40-50 works well.
You should end up with something like this:
Well, I hope you use this tutorial and I'd love to see what you make!
First of all, download these brushes.
Next, create a transparent image, mine was 300x300 however yours can be different.
Now click on Filters-->Render-->Pattern-->Checkerboard.
Also I used black and white. You may use different.
I used a size of 20 Pixels, however you may wish to use smaller, depending on your image size.
You should end up with something like this:
Now Select a color, I used red. Draw a line from the top left to the right hand side, about 4 lines from the top on the right. Now draw some more sloping lines all the way from the right to the left. Make sure that they "join up" vertically - where one line finishes on the right should be exactly where the next line starts on the left.
You should end up with something like this:
Now you may (this is optional) select another color, and draw lines in between the other color. I used blue.
You should end up with something like this:
Now click on Filters-->Distort-->Polar Coordinates.
You should end up with something like this (note: You may only have 1 color if you skipped the previous instruction):
Now go to fill and select a pattern or a color. Dark colors/patterns work best. I used a holo sheet (1/2) (
You should end up with something like this:
No, remember them nice sparkly brushes you downloaded? Select 1-3 of them, and brush around. However, don't get too close to the center of the spiral.
You should end up with something like this:
That's it, however there is something else you can do (it's optional). Create a new transparent layer. Go to Blend and select FG-BG (foreground to background). Now select 2 colors, 1 as your background, 1 as your foreground. I used red and blue, the same as the lines in the spiral. Set the shape to conical. Click in the middle of the new layer and hold Ctrl. Drag it to the right boundary and let go. Now lower the transparency of the layer until you think it looks good. About 40-50 works well.
You should end up with something like this:
Well, I hope you use this tutorial and I'd love to see what you make!

Phoenix- Admin
- Posts : 381
Join date : 2007-12-14 -

Re: Space Tunnel Tutorial (GIMP)
![]() by instinctmeister Sun Dec 16, 2007 9:55 am
by instinctmeister Sun Dec 16, 2007 9:55 am
great tutorial! but what's it for?

instinctmeister- Posts : 91
Join date : 2007-12-14
Age : 28
Location : San Diego!
Re: Space Tunnel Tutorial (GIMP)
![]() by Phoenix Sun Dec 16, 2007 9:57 am
by Phoenix Sun Dec 16, 2007 9:57 am
You know, a space tunnel. If you stare at the center for about 30 seconds, it looks 3D! And it makes a pretty awesome background for a banner! :Pinstinctmeister wrote:great tutorial! but what's it for?
Phoenix- Admin
- Posts : 381
Join date : 2007-12-14 -

Boss Z- Posts : 63
Join date : 2007-12-16
Re: Space Tunnel Tutorial (GIMP)
![]() by Phoenix Sun Dec 16, 2007 1:53 pm
by Phoenix Sun Dec 16, 2007 1:53 pm
Probably, I'm not sure though 'cause I don't have photoshop.Boss Z wrote:Can this be dome on Photoshop...

Phoenix- Admin
- Posts : 381
Join date : 2007-12-14 -
Re: Space Tunnel Tutorial (GIMP)
![]() by Boss Z Sun Dec 16, 2007 2:07 pm
by Boss Z Sun Dec 16, 2007 2:07 pm
When i followed the first step i couldn't find checker board... 
Boss Z- Posts : 63
Join date : 2007-12-16
Re: Space Tunnel Tutorial (GIMP)
![]() by Phoenix Sun Dec 16, 2007 2:09 pm
by Phoenix Sun Dec 16, 2007 2:09 pm
Have you got "Grid"? That might work as well...Boss Z wrote:When i followed the first step i couldn't find checker board...
Phoenix- Admin
- Posts : 381
Join date : 2007-12-14 -
Re: Space Tunnel Tutorial (GIMP)
![]() by Boss Z Sun Dec 16, 2007 2:26 pm
by Boss Z Sun Dec 16, 2007 2:26 pm
Do you mean filter --> grid --> checker board...Phoenix wrote:Have you got "Grid"? That might work as well...Boss Z wrote:When i followed the first step i couldn't find checker board...
Boss Z- Posts : 63
Join date : 2007-12-16
Re: Space Tunnel Tutorial (GIMP)
![]() by Phoenix Mon Dec 17, 2007 10:10 am
by Phoenix Mon Dec 17, 2007 10:10 am
Yeah, it's different on GIMP though.Boss Z wrote:Do you mean filter --> grid --> checker board...Phoenix wrote:Have you got "Grid"? That might work as well...Boss Z wrote:When i followed the first step i couldn't find checker board...
Phoenix- Admin
- Posts : 381
Join date : 2007-12-14 -
Page 1 of 1
Permissions in this forum:
You cannot reply to topics in this forum|
|
|